MySQL 8.4 to 9.0 Upgrade – A Cautionary Tale

This is a cautionary tale about impact of deprecated functionalities in infrastructure when having automatic updates active.

On 04.07.2024 I checked my Nextcloud instance and saw it was offline. I connected with ssh to the virtual machine running Nextcloud to check the logs. They showed that there was an issue with the connection to mysql database.

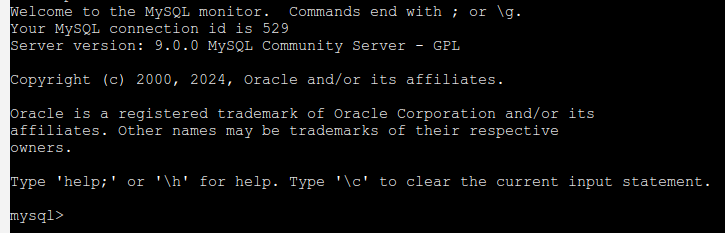
mysql runs in a docker container on a separate VM. All my HomeLab applications which require mysql uses the same instance. This meant that beside Nextcloud other applications were also affected. When I mysql logs, I saw that there was an upgrade from version 8.4.1 to 9.0.0 over night and something broke.

When I tried to connect to the mysql trough command line, I got an error for all the configured users that mysql_native_password is not loaded. I checked version 9.0.0 release notes and saw that mysql-native-password option was removed. This meant that none I couldn’t log in with any of the existing users, which used the old mysql_native_password plugin.

I found the issue, now it was time to search for a solution!

First thing I did was to check how old was my backup. I run an automatic backup mechanism on all my VM’s each Sunday, so the last backup available was from 30.06.2024. If I rolled back the entire VM running mysql container, I would loose almost 4 days worth of data. Before I decided to choose this option, I wanted to explore other options to recover the existing instance.

Next thing I tried was to rollback the mysql docker image to 8.4.1. I changed in the docker-compose file the following parameter image: mysql:8.4.1. After restating the container, I checked the logs trough Portainer and found the following error: invalid mysql server downgrade cannot downgrade from 90000 to 80401. This meant I couldn’t go back to an older mysql version because the database has been already upgraded to the new schema and they were not compatible.

I spent almost an entire day researching online on this topic and asking for support on Discord and Reddit. In the end I found on my own out a solution which helped me recover the existing mysql instance and avoid loosing any data.

I added to docker compose file the option command: –skip-grant-tables then I recreated the container. This allowed me to connect to existing mysql instance without any credentials.

Using Portainer web interface, I opened a shell to mysql instance and typed mysql. Hooray! I was finally in and now I could recover the root password.

According to this documentation I have to run FLUSH PRIVILEGES; before running any account-management instructions.

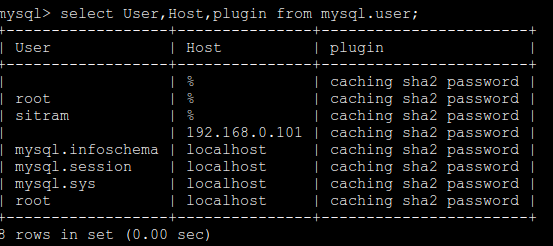
I searched for all users who have the mysql_native_password authentication plugin using command select User,Host,plugin from mysql.user where plugin=’mysql_native_password’;

For each user and host I ran the following command: ALTER USER ‘user’@’host’ IDENTIFIED WITH caching_sha2_password BY ‘new_password’;

I checked again what plugin was configured for each user and saw that it was now changed to the new one.

Once this was done, I removed from docker-compose file command: –skip-grant-tables then recreate the container.

I checked all the applications which used mysql and they are all up and running! Crisis averted! Everything was once again running, at least until the next thing breaks! 😉

If you decide have a HomeLab, make sure you are prepared to deal with situations where stuff break and you don’t have the necessary knowledge to quickly fix them.

Intruder Alert System with Home Assistant – Part 2

This is the second part in my Intruder Alert System series in which I describe my DIY solution to building an automated alarm system using an actual alarm and Home Assistant. Here is the link to Part 1, in case you missed it.

I use a Lovelace dashboard in Home Assistant which gives me a quick overview of my Intruder Alert System and can be easily extended to include additional devices. In the current version it contains alarm sensors and control interfaces provided by Paradox Alarm Interface addon, security cameras provided by Generic Camera integration and lights provided by Tuya-local or SonoffLAN integrations. The dashboard uses Config Template Card that allows me to use pretty much any valid Javascript on the hass object in my configuration.

My house consists of two floors and for each of them I uploaded in Home Assistant an image with the 2D plan location /config/www/alarm. In the same location I uploaded other images which I use to overlay on the main floor plan. Below I included a picture with the dashboard for each floor and details on each configuration parameter.

Floor 1 dashboard

Floor 2 dashboard

Details:

  • entities – option which contains a list of entity strings that should be watched for updates. I added here all the entities that I used in each card. Since I don’t have that many entities, I was able to monitor all of them, but be sure to choose only the most relevant ones in case you have a lot of entities becauase this impacts the performance.
  • card – is of type picture-elements and links to the local image contains the 2D floor plan
  • sensor entities – each sensor is integrated using its own element of type image, linked to the corresponding entity. The state_image option contains links to images used for states on and off which are stored in the same location as above. With style option I control the position of the element on the main image, by adjusting the top, left and width parameters
  • alarm control entity – I have three conditional elements for configuring the states of the entity that controls the arming/disarming of the alarm. The displayed image for each state is configured with image option. The state of the entity is specified with state option. The action to be performed when tapping the displayed image in described in the tap_action option. With style option I control the position of the element on the main image, by adjusting the top, left and width parameters
  • security camera entities – For each security camera I have an image element. The entity option points to the security camera entity. image points to the local image of the security camera which will be displayed on the floor plan. With style option I control the position of the element on the main image, by adjusting the top, left and width parameters.
  • light entities – Currently I only have one light configured, which is mapped to a Sonoff switch. To view it on the dashboard I use an icon element. I configured a template which changes the icon depending on the state of the switch(on/off). tap_action option contains the toggling action to be performed when clicking on the image. Similar to the other entities, with style option I control the position of the element on the main image, by adjusting the top and left parameters. With the color parameter, I change the state of the icon color to yellow when the switch is on and blue when the switch is off.

Conclusions:

This is the current version of the Dashboard that I use for my Intruder Alert System. I covers the second use case defined in Part 1. With it, I can manually activate/deactivate the alarm system remotely, access my security cameras and view the state of each sensor.

In the future, I plan to use Sweet Home 3D and create a more interactive 3D floor plan and I will keep you updated with another blog post when this project will be done.

In the next part of the series, I will described the automation I have sends notifications on my mobile phone and a private Telegram channel when a sensor is activated and the alarm is armed. Below I included the code used for each floor. In case you want to use it, please make sure you change the entities with the ones specific to your integration.

Floor 1 config template card code:

type: custom:config-template-card
entities:
  - switch.sonoff_1000291bc4
  - binary_sensor.birou
  - binary_sensor.hol_intrare
  - binary_sensor.depozit_scara
  - binary_sensor.cutie
  - binary_sensor.living
  - binary_sensor.bucatarie
  - binary_sensor.camara
  - binary_sensor.smoke_detector
  - alarm_control_panel.sp6000_partition_toata_casa
view_layout:
  column: 2
card:
  type: picture-elements
  image: /local/alarm/house_plan_first_floor_alarm.jpg
  elements:
    - type: image
      entity: binary_sensor.birou
      state_image:
        'off': /local/alarm/sensor_inactive.svg
        'on': /local/alarm/sensor_active.svg
      style:
        top: 59.2%
        left: 31.7%
        width: 4%
    - type: image
      entity: binary_sensor.hol_intrare
      state_image:
        'off': /local/alarm/sensor_inactive.svg
        'on': /local/alarm/sensor_active.svg
      style:
        top: 69.2%
        left: 36.5%
        width: 4%
    - type: image
      entity: binary_sensor.depozit_scara
      state_image:
        'off': /local/alarm/sensor_inactive.svg
        'on': /local/alarm/sensor_active.svg
      style:
        top: 47%
        left: 44%
        width: 4%
    - type: image
      entity: binary_sensor.cutie
      state_image:
        'off': /local/alarm/sensor_inactive.svg
        'on': /local/alarm/sensor_active.svg
      style:
        top: 52%
        left: 44%
        width: 4%
    - type: image
      entity: binary_sensor.living
      state_image:
        'off': /local/alarm/sensor_inactive.svg
        'on': /local/alarm/sensor_active.svg
      style:
        top: 67%
        left: 53%
        width: 4%
    - type: image
      entity: binary_sensor.bucatarie
      state_image:
        'off': /local/alarm/sensor_inactive.svg
        'on': /local/alarm/sensor_active.svg
      style:
        top: 70%
        left: 77%
        width: 4%
    - type: image
      entity: binary_sensor.camara
      state_image:
        'off': /local/alarm/sensor_inactive.svg
        'on': /local/alarm/sensor_active.svg
      style:
        top: 78.5%
        left: 80.5%
        width: 4%
    - type: image
      entity: binary_sensor.smoke_detector
      state_image:
        'off': /local/alarm/smoke_alarm_inactive.jpg
        'on': /local/alarm/smoke_alarm_active.jpg
      style:
        top: 78.5%
        left: 60%
        width: 4%
    - type: conditional
      conditions:
        - entity: alarm_control_panel.sp6000_partition_toata_casa
          state: disarmed
      elements:
        - type: image
          image: /local/alarm/security_alarm_disarmed.jpg
          tap_action:
            action: call-service
            service: alarm_control_panel.alarm_arm_away
            service_data:
              entity_id: alarm_control_panel.sp6000_partition_toata_casa
          style:
            top: 78.5%
            left: 47%
            width: 4%
    - type: conditional
      conditions:
        - entity: alarm_control_panel.sp6000_partition_toata_casa
          state: arming
      elements:
        - type: image
          image: /local/alarm/security_alarm_arming.jpg
          tap_action:
            action: call-service
            service: alarm_control_panel.alarm_disarm
            service_data:
              entity_id: alarm_control_panel.sp6000_partition_toata_casa
          style:
            top: 78.5%
            left: 47%
            width: 4%
    - type: conditional
      conditions:
        - entity: alarm_control_panel.sp6000_partition_toata_casa
          state: armed_away
      elements:
        - type: image
          image: /local/alarm/security_alarm_armed.jpg
          tap_action:
            action: call-service
            service: alarm_control_panel.alarm_disarm
            service_data:
              entity_id: alarm_control_panel.sp6000_partition_toata_casa
          style:
            top: 78.5%
            left: 47%
            width: 4%
    - type: image
      entity: camera.camera_fata_dreapta
      image: /local/alarm/security_camera.png
      style:
        top: 89%
        left: 10.3%
        width: 4.3%
    - type: image
      entity: camera.camera_fata_stanga
      image: /local/alarm/security_camera.png
      style:
        top: 93.8%
        left: 87%
        width: 4.3%
    - type: image
      entity: camera.camera_lateral
      image: /local/alarm/security_camera.png
      style:
        top: 31.5%
        left: 91.5%
        width: 4.3%
    - type: image
      entity: camera.camera_spate
      image: /local/alarm/security_camera.png
      style:
        top: 31.4%
        left: 10.7%
        width: 4.3%
    - type: icon
      icon: >-
        ${if (states['switch.sonoff_1000291bc4'].state === 'on')
        'mdi:lightbulb-on';else 'mdi:lightbulb'}
      tap_action:
        action: toggle
      entity: switch.sonoff_1000291bc4
      style:
        top: 35%
        left: 85%
        color: >-
          ${if (states['switch.sonoff_1000291bc4'].state === 'on') 'yellow';else
          'blue'}
        '--iron-icon-height': auto
        '--iron-icon-width': 4vh

Floor 2 config template card code:

type: custom:config-template-card
entities:
  - binary_sensor.dormitor_oaspeti
  - binary_sensor.dormitor_mare
  - binary_sensor.dormitor_sabrina
  - binary_sensor.dresing
  - alarm_control_panel.toata_casa
card:
  type: picture-elements
  image: /local/alarm/house_plan_second_floor_alarm.jpg
  elements:
    - type: image
      entity: binary_sensor.dormitor_oaspeti
      state_image:
        'off': /local/alarm/sensor_inactive.svg
        'on': /local/alarm/sensor_active.svg
      style:
        top: 61%
        left: 37.5%
        width: 4%
    - type: image
      entity: binary_sensor.dormitor_mare
      state_image:
        'off': /local/alarm/sensor_inactive.svg
        'on': /local/alarm/sensor_active.svg
      style:
        top: 56%
        left: 67%
        width: 4%
    - type: image
      entity: binary_sensor.dormitor_sabrina
      state_image:
        'off': /local/alarm/sensor_inactive.svg
        'on': /local/alarm/sensor_active.svg
      style:
        top: 69%
        left: 70%
        width: 4%
    - type: image
      entity: binary_sensor.dresing
      state_image:
        'off': /local/alarm/sensor_inactive.svg
        'on': /local/alarm/sensor_active.svg
      style:
        top: 79%
        left: 48%
        width: 4%
    - type: conditional
      conditions:
        - entity: alarm_control_panel.toata_casa
          state: disarmed
      elements:
        - type: image
          image: /local/alarm/security_alarm_disarmed.jpg
          tap_action:
            action: call-service
            service: alarm_control_panel.alarm_arm_away
            service_data:
              entity_id: alarm_control_panel.toata_casa
          style:
            top: 67.5%
            left: 57%
            width: 4%
    - type: conditional
      conditions:
        - entity: alarm_control_panel.toata_casa
          state: arming
      elements:
        - type: image
          image: /local/alarm/security_alarm_arming.jpg
          tap_action:
            action: call-service
            service: alarm_control_panel.alarm_disarm
            service_data:
              entity_id: alarm_control_panel.toata_casa
          style:
            top: 67.5%
            left: 57%
            width: 4%
    - type: conditional
      conditions:
        - entity: alarm_control_panel.toata_casa
          state: armed_away
      elements:
        - type: image
          image: /local/alarm/security_alarm_armed.jpg
          tap_action:
            action: call-service
            service: alarm_control_panel.alarm_disarm
            service_data:
              entity_id: alarm_control_panel.toata_casa
          style:
            top: 67.5%
            left: 57%
            width: 4%

Intruder Alert System with Home Assistant – Part 1

Over the years I have gathered a lot of subscriptions, which add to quite a substantial amount of money that I have to pay every month. After I installed the alarm system from Paradox in my house, I was surprised to see that they also have a yearly subscription to get notifications on your phone and do some basic remote alarm configurations.

Having an instance of Home Assistant running in my HomeLab, I started to research if it was possible to integrate my alarm system and create an automation to offer at least the same functionality as the manufacturer and avoid paying their subscription. This post is the first part in a series I plan to share with you in which I offer details on my DYI Intruder Alert System with Home Assistant.

My alarm system is Paradox Spectra SP6000+ with 8 zones which can have 2 physical sensors attached to them using resistance of different values. I have one motion sensor in every room of the house, a smoke detector in the kitchen and a siren outside on the front house wall. They are all connected to a central panel together with a small battery which can offer up to a day of runtime in case the power is lost. In order to communicate over Ethernet with my HomeLab, I bought from Paradox an IP150 Internet Module. I spent almost two months mounting and wiring all the sensors and researching online for various tutorials on how to configure the alarm system. Paradox offers paid training to certified installers so the information was quite difficult to obtain. Having all the necessary hardware, it was time to focus on the software and see what wonders I could do!

First thing I did was to install and configure Paradox Alarm Interface addon in Home Assistant. This is a middleware that connects to a Paradox Alarm panel, exposing the interface for monitoring and control through MQTT. I won’t detail the installations steps, because they can be found in PAI’s wiki. Once the configuration was done, I suddenly had 48 entities available in MQTT integration from Home Assistant, with various information from my alarm system. I could see in real-time when a sensor was active, arm or disarm the alarm and other internal signals. It was time now to put my thinking cap and do something useful with all this information.

Next I created a list of use cases for my future Intruder Alert System so I could figure out what functionalities available in Home Assistant I codul use. I came up with the following 4 use cases

  • Notification on sensor activation when alarm is armed
  • Dashboard to provide a quick overview of my Intruder Alert System
  • Arming the system when leaving home
  • Disarming the system when returning home

The final step was to somehow start implementing the use cases. I didn’t have much experience back then with Home Assistant, so this project involved quite a steep learning curve. In my first iteration, I implemented all use cases except the dashboard in NodeRed because of it’s nice graphical interface. Recently I started to migrate from NodeRed to native Home Assistant automations, because there are some limitations with it and in the recent releases of HomeAssistant the GUI for automations has been improved a lot.

In the next part of the series, I will provide details on the dashboard I created to give me a quick overview of my Intruder Alert System.

Ce inseamna sa fii prosumator la Hidroelectrica in 2024?

In Mai 2024 am devenit prosumator la Hidroelectrica si spre marea mea suprindere, o luna mai tarziu am primit prima factura.

Pentru ca nu mi-a fost clar mecanismul de compensare cantitativa, am sunat la relatii cu clientii la Hidroelectrica, ca sa ma lamuresc cum pot sa folosesc valoarea de la punctul 9(sold energie electrica livrata). Mai jos am sumarizat informatiile primite.

  • 58 kWh -> consum energie activa din retea(punctul 8).
  • 669 kWh -> energie activa livrata in retea(tabelul mic pagina 2 factura)
  • 28.56 ron -> taxe de transport pentru cei 58 kWh consumati ce reprezinta factura pe luna Mai 2024 pe care trebuie sa o platesc(punctul 5).
  • -171.08 ron -> (669kWh – 58kWh)* 0.28 ron/kWh – suma primita pentru surplusul de energie electrica activa livrata in retea dupa ce mi s-a scazut kWh consumati(punctul 9)
  • Valoare de la punctul 9 poate fi folosita DOAR pentru compensarea energiei active consumata din retea in lunile urmatoare!
  • Valoare de la punctul 9 NU poate fi folosita pentru a acoperi taxele de transport sau orice alte sume restante din soldul contului.

Sa presupunem ca in luna Iunie 2024 nu livrez nimic in retea si consum 100 kWh. Dupa intelegerea mea, voi avea de platit ~58 ron factura si raman cu ~143 ron sold pentru compensarea energiei active din lunile urmatoare. Mai jos am am detaliat cum am ajuns la aceste cifre:

  • 58.31 ron -> 100 * (0.77 – 0.28)) * 1.19 – taxele de transport + TVA pentru 100 kWh energie activa consumata din retea la pretul final de 0.77 ron/kWh
  • 28 ron -> 100 * 0.28 – cost energie activa consumata din retea.
  • 143.08 -> -171.08 + 28 – Sold de energie activa ramas dupa compensarea costului celor 100 kWh. Valoarea asta voi putea sa o folosesc pentru compensarea energiei activa in lunile urmatoare.

Concluzii:

Cat timp legislatia curenta nu se schimba si pentru surplusul de energie activa injectata in retea se emite o factura cu data scadenta pentru 2 ani, sumele platite pentru taxele de transport voi putea sa incep sa ii recuperez abia peste 2 ani.

Tinand cont de ce am scris mai sus si ca nu am baterii, cel mai importat e sa imi optimizez consumul casei in asa fel incat sa folosesc cat mai multa energie pe care o produc panourile fotovoltaice. Din experienta mea de pana acum, fara investitii prea mari mari, ceea ce m-a ajutat a fost:

  • folosire electrocasnice cand am productie pe timpul zilei
  • HomeAssistant cu integrare invertor(actualizare date la 5s)
  • prize inteligente
  • diverse automatizari

Am integrat invertorul de la Huawei si am creat o automatizare care actualizeaza datele la 5 secunde. Am gasit niste addon-uri care m-au ajutat sa creez grafice care imi ofera informatii despre consumul instant si din timpul zilei, similar cu ce ofera aplicatia FusionSolar.

Am utomatizat pornirea/oprirea incarcarii masinii electrice(Dacia Spring) in functie de surplus livrat in retea. Itegrarea folosita e de la Renault si are o limitare a querry-urilor facute la ~10 minute

Am integrat clima si pot sa controlez manual fiecare unitate interoara.

Urmeaza sa achizitonez mai multe prize electrice care permit monitorizarea energiei electrice, sa le integrez in HomeAssistant si sa ma gandesc la ce alte automatizari mai pot crea.

Single point of failure

My biggest fear when it comes to the current architecture of my HomeLab is that the computer I use as a server acts as a single point of failure.

Looking at the definition from Wikipedia, SPOF is a system or a part of a system that, if it fails, will stop the entire system from working. If I consider my entire HomeLab as a system that offers various functionalities to my house, the main server is the the subsystem that is the SPOF. I have other subsystems, like security cameras, wireless routers, the security alarm and various IoT equipment which are independent. If they fail, I won’t have access to a certain functionality. The main server however, binds everything together, supports additional subsystems and acts as the gate to access the Internet. This is why I consider it as a single point of failure.

From everything that is hosted on the main server, the VM that runs pfSense and acts as DHCP server and firewall for my local network, is the critical one. If that one fails, the entire house remains without access to Internet. I have as backup the option to use mobile data plan from my phone, but the connection in the area where I leave is very bad.

Recently I experienced my first panic caused by having the main server offline. There was a power shortage which lasted for almost 40 minutes. This is a bit more than what my UPS can handle. After about 30 minutes, the UPS successfully shut down the server. It was a relief that I configured this feature correctly, because since almost a year since I added the UPS, I didn’t get to test this functionality.

When the power came back, I started the server and, after 10 minutes, I was surprised that I still couldn’t access its web interface. Usually it only takes a few minutes to be able to access Proxmox interface after a server reboot. I went to the closet where the server is physically located and, to my horror, I saw that the booting process was stuck. I tried to boot an older versions of the kernel, maybe the latest version had some bug. Unfortunately I got the same behavior. Next, I removed the quiet mode to begin troubleshooting this issue. The service which set up the network was the one causing issues. It looked like it was waiting for something and because the service had no timeout, it remained in this state forever.

I started to search for similar symptoms online and after about an hour of research, I came across this wiki entry from Proxmox. The page said that there the network setup service would get stuck in Proxmox 8 if ntp and ntpdate was used. This looked very similar to my symptoms and I knew one of the services running was ntp which provides synchronized time to all the clients from my local network. I quickly started in recovery mode, uninstalled ntp and ntp-date and rebooted the server. The booting process was finalized with success and everything came back online. You cannot imagine my relief when I realized that this issue was solved.

Even if the fix turned out to be a simple one and the downtime was only a few hours, I got scared. This made me begin to think about the robustness of the architecture I use for my HomeLab and what improvements I could make. As I said above, my server binds a lot of subsystems together and offers additional services to my house. If it goes offline, I’m left in the dark. From everything that runs on the server what services are critical?

After a lot of thinking, I came up with two candidates:

  • pfSense
  • TrueNAS

pfSense VM acts as a firewall and DHCP server for my entire house. It maintains the PPPoE connection to my ISP which provides access to Internet. TrueNAS VM acts as a NAS server. It manages backups to all my VM’s, various documents and media content.

Both of these servers run in virtual machines on the main server. When the server goes offline, I lose access to Internet, my data and backups. So what can I do to improve this situation?

First option is to move both of these VM’s to dedicated hardware. If the main server goes offline, at least the critical services provided by these two servers would continue to be available. For the fpSense a micro pc should be enough, as long as it has 2 Gigabit Ethernet ports. For TrueNAS, there are a lot of specialized NAS computers which can support my 5 HDD’s. My HomeLab would increase from one PC to three. The downside of this solution is a higher upfront cost for new equipment, higher energy consumption and higher maintenance cost in case of hardware failure. The reason I bought the main pc in the first place was so that I could run everything on a single hardware, reduce the energy consumption and the maintenance cost. If I start migrating everything to separate hardware, what’s the point of having the main server?

A second option is to migrate only one of the virtual machines to dedicated hardware. Out of the two VM’s I will probably chose the pfSense because having constant access to Internet is more important than having access to my data and backups. The downside to this solution is the upfront cost with new hardware, higher energy consumption and not having an easy access to my backups in case of failures of the main server.

A third option is to keep everything as it is. The downside to this solution is that in case of a hardware failure on my main server, I won’t have access to Internet or to my backups. Not having access to Internet makes debugging a failure very difficult. I could use the data plan on my mobile phone, but it’s very slow.

It turns out that increasing the robustness of my HomeLab architecture is not an easy task. Stay tuned to see which option I will chose.

What to do with USD in Romania?

It turns out that it is very difficult to do something useful in Romania with US Dollars and below I’d like to share my experience on this matter.

A while ago I worked at a company which offered RSU(Restricted Stock Units) as a form of employee benefits. After a certain period of time, the stock was transferred to me, and I could do whatever I wanted with it. I decided to sell the it, because the company stock appreciated quite a lot and I wasn’t sure the price will would remain like that for a long time. I ended up with a bunch of US Dollars in my US broker account and I somehow had to figure out how to get them in Romania, the country where I lived, so I could actually benefit from them.

The US broker offered two options to transfer the money to a bank. I could either transfer them to an USD account with no additional fee, or convert the USD to a certain currency, for a rather high fee. I didn’t want to pay a fee for converting them either to EUR or RON(Romanian currency) which were the only two currencies in which I had accounts in my own country, but I didn’t had an USD account either.

After asking several banks in Romania if they offered an account in USD, it turned out I didn’t had that many options. I found a bank which offered an account in USD but it had a monthly maintenance fees, and the conversion from USD to RON was very bad. As you probably already figured out, I hate paying fees so at that time, my options were not looking so good.

In the end I chose to risk it and go with Revolut which offered a free USD account, even if I heard some horror stories with accounts being blocked. I reached out to support and inform them that a larger payment would arrive in my account. I asked them if they need any documents to prove where the money originated from. They said it was ok and I didn’t had to send anything. This way I hoped to avoid my account to be blocked. I finally issued the transfer from the US broker to my Revolut account. It took almost two weeks, but in the end the money arrived in my account and I felt relieved that the entire adventure was over!

Next step was to figure out what to do with my nice and shiny pile of… virtual $$$ 🤑

I did the only logical thing in this situation, create a list of pros/cons 🤣

Pros:

  • Increase diversity of the cash I owned
  • Avoid currency conversion fees when buying financial instruments or goods denominated in USD

Cons:

  • Difficult to find a bank in Romania that offers an USD account without additional fees to keep the money for a longer period of time
  • Limited availability of USD deposits
  • Transfers between USD accounts took a long time and had high fees compared to SEPA transfers in EUR
  • Almost no products in Europe are sold in USD
  • Exchange rate to other currency at banks were very bad

I ended up using once again Revolut. As part of the free standard plan I could exchange every month with no fee and at a decent rate, up to the equivalent of 5000 RON from USD.

I don’t know if this was the best decision but it was the best I could find with the available information at that time. Feel free to leave a comment with what you have done in a similar situation.

How I started my HomeLab

Initially I started my adventure in building an HomeLab on an old laptop, where I installed Proxmox and did some testing with several VM’s and HomeAssistant.

It probably would have been enough if it didn’t had two annoying issues. Every couple of days, the laptop froze and I had to manually reboot it. The second issue was that BIOS did not support resuming to the last power state in case of a power shortage. I couldn’t run the laptop for more then a few days without having to physically interact with it which meant I didn’t have a reliable server for running services or home automation.

After struggling with this setup for a couple of months I decided it was time for an upgrade.

I spent several weeks researching online about best practices in hardware builds for an HomeLab. I read blogs, joined several groups dedicated to this topic on Reddit and Facebook. The more time I spent researching, the more I got frustrated of how easy it was for people living in US, Germany or UK to access all kind of second hand server-grade equipment at heavily discounted price. I either had to make a compromise and buy consumer grade equipment, spent extra money on shipping tax to order it outside of my own country, or get lucky and find a good deal in my own country.

In the end, it payed off to be patient, because I got lucky and found a complete system for sale locally. I asked for opinions on Reddit before committing to buying it, and everybody said it was overkill for what I wanted to run in my HomeLab. In the end, I chose to disregarded their advices and went with my gut feeling. I payed for the entire PC around 800$ and now I had the equipment needed to fulfill any project I wanted.

My future server was a beast:

  • CPU: 2x Intel Xeon E5-2640 v3, 2.6Ghz, 8 cores, 16 threads
  • Motherboard: ASUS Z10pe-d8
  • RAM: 192 GB Kingston DDR4 2400MHz with ECC
  • PSU: 750W Segotep 80+ Platinum
  • Black case

The PC was sold without any storage or optical units. I didn’t need any CD-ROM or DVD-ROM for what I intended to use it, but I had to do something for storage. I added 3 spare HDD’s from old laptops I had laying around. Two drives of 1 TB each were configured in ZFS mirror RAID to have some kind of redundancy for my critical data. The third HDD was a smaller one, around 750 GB and I decided to use it to store less important data, like tv shows and movies. For the host operating system I bought a 1TB M.2 2280 consumer SSD from SWORDFISH. The final purchase was an 1 GB Ethernet PCIe card which I planed to passthrough to a VM running a dedicated firewall.

Having all the necessary hardware it was time to second phase into the wonderfull world of building and maintaining a HomeLab, installing the needed software.

Over time, the HomeLab grew by adding IoT devices, Wifi range extender, climate control, UPS, printer and other equipment. Most of the hardware is housed in a rack, mounted on a wall under the staircase in my house. The rack is located in a separate room which I use as a closet. This helps a lot to reduce the discomfort caused by noise and heat. At least once a year, I unplug the equipment and clean it with compressed air.

I chose Proxmox as the host operating system used for virtualization with various services running in multiple VM’s. Initially I started with VM’s running a firewall, local DNS, various docker containers and a few more test servers. The software, services and the overall architecture of my my HomeLab are constantly adapting and evolving when I find some kind of software or an equipment which adds value to my HomeLab.

I think overall it was a good decision to start my own HomeLab even if the journey is not an easy one. I gained a lot of experience and I added a lot of functionalities which bring value. I learned the importance of having a robust system and the effort it takes to maintain it. I learned the important of documentation and this is the reason why I put so much effort into setting up this repository. Besides having cool functionalities, I maintaining a HomeLab builds a set of skills which are valuable in other aspects of my life.

My only regret is that I couldn’t convince any of my friends or family to become interested in this stuff. Everyone I talked with thinks what I do is cool, but they don’t want to get into it. Because of this it’s been a rather lonley journey.

The most important thing I learned along the way, was that no matter how awesome my HomeLab is, if the Internet is my house is down because of my stuff, I’m screwed! 🙂