
This is the second part in my Intruder Alert System series in which I describe my DIY solution to building an automated alarm system using an actual alarm and Home Assistant. Here is the link to Part 1, in case you missed it.
I use a Lovelace dashboard in Home Assistant which gives me a quick overview of my Intruder Alert System and can be easily extended to include additional devices. In the current version it contains alarm sensors and control interfaces provided by Paradox Alarm Interface addon, security cameras provided by Generic Camera integration and lights provided by Tuya-local or SonoffLAN integrations. The dashboard uses Config Template Card that allows me to use pretty much any valid Javascript on the hass object in my configuration.
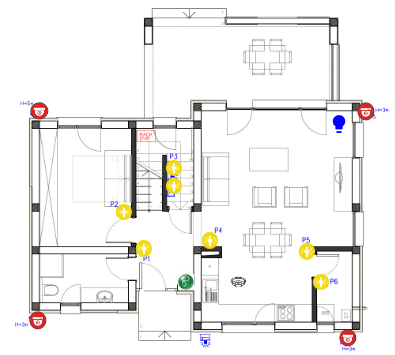
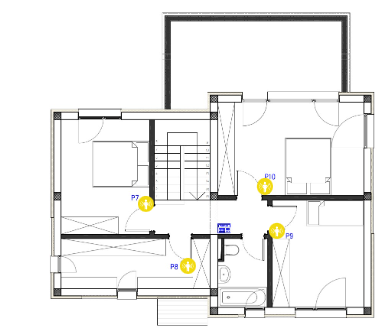
My house consists of two floors and for each of them I uploaded in Home Assistant an image with the 2D plan location /config/www/alarm. In the same location I uploaded other images which I use to overlay on the main floor plan. Below I included a picture with the dashboard for each floor and details on each configuration parameter.
Floor 1 dashboard
Floor 2 dashboard
Details:
- entities – option which contains a list of entity strings that should be watched for updates. I added here all the entities that I used in each card. Since I don’t have that many entities, I was able to monitor all of them, but be sure to choose only the most relevant ones in case you have a lot of entities becauase this impacts the performance.
- card – is of type
picture-elementsand links to the local image contains the 2D floor plan - sensor entities – each sensor is integrated using its own element of type image, linked to the corresponding entity. The
state_imageoption contains links to images used for statesonandoffwhich are stored in the same location as above. Withstyleoption I control the position of the element on the main image, by adjusting thetop,leftandwidthparameters - alarm control entity – I have three
conditionalelements for configuring the states of the entity that controls the arming/disarming of the alarm. The displayed image for each state is configured withimageoption. The state of the entity is specified withstateoption. The action to be performed when tapping the displayed image in described in thetap_actionoption. Withstyleoption I control the position of the element on the main image, by adjusting thetop,leftandwidthparameters - security camera entities – For each security camera I have an
imageelement. The entityoptionpoints to the security camera entity.imagepoints to the local image of the security camera which will be displayed on the floor plan. Withstyleoption I control the position of the element on the main image, by adjusting thetop,leftandwidthparameters. - light entities – Currently I only have one light configured, which is mapped to a Sonoff switch. To view it on the dashboard I use an
iconelement. I configured a template which changes the icon depending on the state of the switch(on/off).tap_actionoption contains the toggling action to be performed when clicking on the image. Similar to the other entities, withstyleoption I control the position of the element on the main image, by adjusting thetopandleftparameters. With thecolorparameter, I change the state of the icon color toyellowwhen the switch isonandbluewhen the switch isoff.
Conclusions:
This is the current version of the Dashboard that I use for my Intruder Alert System. I covers the second use case defined in Part 1. With it, I can manually activate/deactivate the alarm system remotely, access my security cameras and view the state of each sensor.
In the future, I plan to use Sweet Home 3D and create a more interactive 3D floor plan and I will keep you updated with another blog post when this project will be done.
In the next part of the series, I will described the automation I have sends notifications on my mobile phone and a private Telegram channel when a sensor is activated and the alarm is armed. Below I included the code used for each floor. In case you want to use it, please make sure you change the entities with the ones specific to your integration.
Floor 1 config template card code:
type: custom:config-template-card
entities:
  - switch.sonoff_1000291bc4
  - binary_sensor.birou
  - binary_sensor.hol_intrare
  - binary_sensor.depozit_scara
  - binary_sensor.cutie
  - binary_sensor.living
  - binary_sensor.bucatarie
  - binary_sensor.camara
  - binary_sensor.smoke_detector
  - alarm_control_panel.sp6000_partition_toata_casa
view_layout:
  column: 2
card:
  type: picture-elements
  image: /local/alarm/house_plan_first_floor_alarm.jpg
  elements:
    - type: image
      entity: binary_sensor.birou
      state_image:
        'off': /local/alarm/sensor_inactive.svg
        'on': /local/alarm/sensor_active.svg
      style:
        top: 59.2%
        left: 31.7%
        width: 4%
    - type: image
      entity: binary_sensor.hol_intrare
      state_image:
        'off': /local/alarm/sensor_inactive.svg
        'on': /local/alarm/sensor_active.svg
      style:
        top: 69.2%
        left: 36.5%
        width: 4%
    - type: image
      entity: binary_sensor.depozit_scara
      state_image:
        'off': /local/alarm/sensor_inactive.svg
        'on': /local/alarm/sensor_active.svg
      style:
        top: 47%
        left: 44%
        width: 4%
    - type: image
      entity: binary_sensor.cutie
      state_image:
        'off': /local/alarm/sensor_inactive.svg
        'on': /local/alarm/sensor_active.svg
      style:
        top: 52%
        left: 44%
        width: 4%
    - type: image
      entity: binary_sensor.living
      state_image:
        'off': /local/alarm/sensor_inactive.svg
        'on': /local/alarm/sensor_active.svg
      style:
        top: 67%
        left: 53%
        width: 4%
    - type: image
      entity: binary_sensor.bucatarie
      state_image:
        'off': /local/alarm/sensor_inactive.svg
        'on': /local/alarm/sensor_active.svg
      style:
        top: 70%
        left: 77%
        width: 4%
    - type: image
      entity: binary_sensor.camara
      state_image:
        'off': /local/alarm/sensor_inactive.svg
        'on': /local/alarm/sensor_active.svg
      style:
        top: 78.5%
        left: 80.5%
        width: 4%
    - type: image
      entity: binary_sensor.smoke_detector
      state_image:
        'off': /local/alarm/smoke_alarm_inactive.jpg
        'on': /local/alarm/smoke_alarm_active.jpg
      style:
        top: 78.5%
        left: 60%
        width: 4%
    - type: conditional
      conditions:
        - entity: alarm_control_panel.sp6000_partition_toata_casa
          state: disarmed
      elements:
        - type: image
          image: /local/alarm/security_alarm_disarmed.jpg
          tap_action:
            action: call-service
            service: alarm_control_panel.alarm_arm_away
            service_data:
              entity_id: alarm_control_panel.sp6000_partition_toata_casa
          style:
            top: 78.5%
            left: 47%
            width: 4%
    - type: conditional
      conditions:
        - entity: alarm_control_panel.sp6000_partition_toata_casa
          state: arming
      elements:
        - type: image
          image: /local/alarm/security_alarm_arming.jpg
          tap_action:
            action: call-service
            service: alarm_control_panel.alarm_disarm
            service_data:
              entity_id: alarm_control_panel.sp6000_partition_toata_casa
          style:
            top: 78.5%
            left: 47%
            width: 4%
    - type: conditional
      conditions:
        - entity: alarm_control_panel.sp6000_partition_toata_casa
          state: armed_away
      elements:
        - type: image
          image: /local/alarm/security_alarm_armed.jpg
          tap_action:
            action: call-service
            service: alarm_control_panel.alarm_disarm
            service_data:
              entity_id: alarm_control_panel.sp6000_partition_toata_casa
          style:
            top: 78.5%
            left: 47%
            width: 4%
    - type: image
      entity: camera.camera_fata_dreapta
      image: /local/alarm/security_camera.png
      style:
        top: 89%
        left: 10.3%
        width: 4.3%
    - type: image
      entity: camera.camera_fata_stanga
      image: /local/alarm/security_camera.png
      style:
        top: 93.8%
        left: 87%
        width: 4.3%
    - type: image
      entity: camera.camera_lateral
      image: /local/alarm/security_camera.png
      style:
        top: 31.5%
        left: 91.5%
        width: 4.3%
    - type: image
      entity: camera.camera_spate
      image: /local/alarm/security_camera.png
      style:
        top: 31.4%
        left: 10.7%
        width: 4.3%
    - type: icon
      icon: >-
        ${if (states['switch.sonoff_1000291bc4'].state === 'on')
        'mdi:lightbulb-on';else 'mdi:lightbulb'}
      tap_action:
        action: toggle
      entity: switch.sonoff_1000291bc4
      style:
        top: 35%
        left: 85%
        color: >-
          ${if (states['switch.sonoff_1000291bc4'].state === 'on') 'yellow';else
          'blue'}
        '--iron-icon-height': auto
        '--iron-icon-width': 4vh
Floor 2 config template card code:
type: custom:config-template-card
entities:
  - binary_sensor.dormitor_oaspeti
  - binary_sensor.dormitor_mare
  - binary_sensor.dormitor_sabrina
  - binary_sensor.dresing
  - alarm_control_panel.toata_casa
card:
  type: picture-elements
  image: /local/alarm/house_plan_second_floor_alarm.jpg
  elements:
    - type: image
      entity: binary_sensor.dormitor_oaspeti
      state_image:
        'off': /local/alarm/sensor_inactive.svg
        'on': /local/alarm/sensor_active.svg
      style:
        top: 61%
        left: 37.5%
        width: 4%
    - type: image
      entity: binary_sensor.dormitor_mare
      state_image:
        'off': /local/alarm/sensor_inactive.svg
        'on': /local/alarm/sensor_active.svg
      style:
        top: 56%
        left: 67%
        width: 4%
    - type: image
      entity: binary_sensor.dormitor_sabrina
      state_image:
        'off': /local/alarm/sensor_inactive.svg
        'on': /local/alarm/sensor_active.svg
      style:
        top: 69%
        left: 70%
        width: 4%
    - type: image
      entity: binary_sensor.dresing
      state_image:
        'off': /local/alarm/sensor_inactive.svg
        'on': /local/alarm/sensor_active.svg
      style:
        top: 79%
        left: 48%
        width: 4%
    - type: conditional
      conditions:
        - entity: alarm_control_panel.toata_casa
          state: disarmed
      elements:
        - type: image
          image: /local/alarm/security_alarm_disarmed.jpg
          tap_action:
            action: call-service
            service: alarm_control_panel.alarm_arm_away
            service_data:
              entity_id: alarm_control_panel.toata_casa
          style:
            top: 67.5%
            left: 57%
            width: 4%
    - type: conditional
      conditions:
        - entity: alarm_control_panel.toata_casa
          state: arming
      elements:
        - type: image
          image: /local/alarm/security_alarm_arming.jpg
          tap_action:
            action: call-service
            service: alarm_control_panel.alarm_disarm
            service_data:
              entity_id: alarm_control_panel.toata_casa
          style:
            top: 67.5%
            left: 57%
            width: 4%
    - type: conditional
      conditions:
        - entity: alarm_control_panel.toata_casa
          state: armed_away
      elements:
        - type: image
          image: /local/alarm/security_alarm_armed.jpg
          tap_action:
            action: call-service
            service: alarm_control_panel.alarm_disarm
            service_data:
              entity_id: alarm_control_panel.toata_casa
          style:
            top: 67.5%
            left: 57%
            width: 4%